
ミックススキン(グリーン、ブルー、レッド)をカスマイズする記事です。
以前のバージョンの見出し(H2)にカスタマイズする
実は、今のミックススキンは、バージョンアップしたものです。
バージョンアップの時に、ミックススキンの特徴であった見出し(H2)のスタイルを今のシンプルなスタイルに変更しました。
でも、意外とバージョンアップ前の見出しを気に入っていた人が多かったようで、中にはメールで「前の見出しに戻せませんか?」という要望ももらったりしていました。(要望に答えられずすみません)
一度バージョンアップしてしまったので戻すのは難しいですが、以前の見出し(H2)がよかった人向けに、H2だけを前のバージョンにするCSSとアレンジしたCSSを紹介します。
グラデーション+影+吹き出し+先頭大文字
ミックスグリーン
以前のバージョンのH2はこんな感じで、グラデーション+影+吹き出し+先頭だけ大きい文字というスタイルでした。

このH2のCSSは次の通りです。
.article h2{
  border:none;
  position: relative;
  margin-bottom: 30px;
  padding: 0.8em;
  background: linear-gradient(#015a32 0% , #27a26b 100%);
  color: #fff;
  font-size: 22px;
  font-weight: bold;
  border-radius: 5px;
  -webkit-border-radius: 5px;
  -moz-border-radius: 5px;
  box-shadow: 4px 4px 3px rgba(0, 0, 0, 0.5);
}
.article h2:after{
  position: absolute;
  bottom: -15px;
  left: 10%;
  z-index: 90;
  margin-left: -15px;
  border-top: 15px solid #27a26b;
  border-left: 15px solid transparent;
  border-right: 15px solid transparent;
  border-bottom: 0;
  content: "";
}
.article h2:first-letter {
    font-size: 1.7em;
}
ミックスブルー

同様に、ミックスブルーは以下のCSSです。
.article h2{
  border:none;
  position: relative;
  margin-bottom: 30px;
  padding: 0.8em;
  background: linear-gradient(#0a2e63 0% , #3f65a9 100%);
  color: #fff;
  font-size: 22px;
  font-weight: bold;
  border-radius: 5px;
  -webkit-border-radius: 5px;
  -moz-border-radius: 5px;
  box-shadow: 4px 4px 3px rgba(0, 0, 0, 0.5);
}
.article h2:after{
  position: absolute;
  bottom: -15px;
  left: 10%;
  z-index: 90;
  margin-left: -15px;
  border-top: 15px solid #3f65a9;
  border-left: 15px solid transparent;
  border-right: 15px solid transparent;
  border-bottom: 0;
  content: "";
}
.article h2:first-letter {
    font-size: 1.7em;
}
ミックスレッド

ミックスレッドは以下のCSS。
.article h2{
  border:none;
  position: relative;
  margin-bottom: 30px;
  padding: 0.8em;
  background: linear-gradient(#c10339 0% , #c15171 100%);
  color: #fff;
  font-size: 22px;
  font-weight: bold;
  border-radius: 5px;
  -webkit-border-radius: 5px;
  -moz-border-radius: 5px;
  box-shadow: 4px 4px 3px rgba(0, 0, 0, 0.5);
}
.article h2:after{
  position: absolute;
  bottom: -15px;
  left: 10%;
  z-index: 90;
  margin-left: -15px;
  border-top: 15px solid #c15171;
  border-left: 15px solid transparent;
  border-right: 15px solid transparent;
  border-bottom: 0;
  content: "";
}
.article h2:first-letter {
    font-size: 1.7em;
}
グラデーション+影+吹き出し
ミックスグリーン
さきほどのH2から「先頭が大きい文字」スタイルを削除したものです。

.article h2{
  border:none;
  position: relative;
  margin-bottom: 30px;
  padding: 0.8em;
  background: linear-gradient(#015a32 0% , #27a26b 100%);
  color: #fff;
  font-size: 22px;
  font-weight: bold;
  border-radius: 5px;
  -webkit-border-radius: 5px;
  -moz-border-radius: 5px;
  box-shadow: 4px 4px 3px rgba(0, 0, 0, 0.5);
}
.article h2:after{
  position: absolute;
  bottom: -15px;
  left: 10%;
  z-index: 90;
  margin-left: -15px;
  border-top: 15px solid #27a26b;
  border-left: 15px solid transparent;
  border-right: 15px solid transparent;
  border-bottom: 0;
  content: "";
}
ミックスブルー

ミックスブルーのCSS。
.article h2{
  border:none;
  position: relative;
  margin-bottom: 30px;
  padding: 0.8em;
  background: linear-gradient(#0a2e63 0% , #3f65a9 100%);
  color: #fff;
  font-size: 22px;
  font-weight: bold;
  border-radius: 5px;
  -webkit-border-radius: 5px;
  -moz-border-radius: 5px;
  box-shadow: 4px 4px 3px rgba(0, 0, 0, 0.5);
}
.article h2:after{
  position: absolute;
  bottom: -15px;
  left: 10%;
  z-index: 90;
  margin-left: -15px;
  border-top: 15px solid #3f65a9;
  border-left: 15px solid transparent;
  border-right: 15px solid transparent;
  border-bottom: 0;
  content: "";
}
ミックスレッド

ミックスレッドのCSS。
.article h2{
  border:none;
  position: relative;
  margin-bottom: 30px;
  padding: 0.8em;
  background: linear-gradient(#c10339 0% , #c15171 100%);
  color: #fff;
  font-size: 22px;
  font-weight: bold;
  border-radius: 5px;
  -webkit-border-radius: 5px;
  -moz-border-radius: 5px;
  box-shadow: 4px 4px 3px rgba(0, 0, 0, 0.5);
}
.article h2:after{
  position: absolute;
  bottom: -15px;
  left: 10%;
  z-index: 90;
  margin-left: -15px;
  border-top: 15px solid #c15171;
  border-left: 15px solid transparent;
  border-right: 15px solid transparent;
  border-bottom: 0;
  content: "";
}
グラデーション+吹き出し
ミックスグリーン

続いては、さらに「影」のスタイルを削除したものです。
.article h2{
  border:none;
  position: relative;
  margin-bottom: 30px;
  padding: 0.8em;
  background: linear-gradient(#015a32 0% , #27a26b 100%);
  color: #fff;
  font-size: 22px;
  font-weight: bold;
  border-radius: 5px;
  -webkit-border-radius: 5px;
  -moz-border-radius: 5px;
}
.article h2:after{
  position: absolute;
  bottom: -15px;
  left: 10%;
  z-index: 90;
  margin-left: -15px;
  border-top: 15px solid #27a26b;
  border-left: 15px solid transparent;
  border-right: 15px solid transparent;
  border-bottom: 0;
  content: "";
}
ミックスブルー

ミックスブルーのCSS。
.article h2{
  border:none;
  position: relative;
  margin-bottom: 30px;
  padding: 0.8em;
  background: linear-gradient(#0a2e63 0% , #3f65a9 100%);
  color: #fff;
  font-size: 22px;
  font-weight: bold;
  border-radius: 5px;
  -webkit-border-radius: 5px;
  -moz-border-radius: 5px;
}
.article h2:after{
  position: absolute;
  bottom: -15px;
  left: 10%;
  z-index: 90;
  margin-left: -15px;
  border-top: 15px solid #3f65a9;
  border-left: 15px solid transparent;
  border-right: 15px solid transparent;
  border-bottom: 0;
  content: "";
}
ミックスレッド

ミックスレッドのCSS。
.article h2{
  border:none;
  position: relative;
  margin-bottom: 30px;
  padding: 0.8em;
  background: linear-gradient(#c10339 0% , #c15171 100%);
  color: #fff;
  font-size: 22px;
  font-weight: bold;
  border-radius: 5px;
  -webkit-border-radius: 5px;
  -moz-border-radius: 5px;
}
.article h2:after{
  position: absolute;
  bottom: -15px;
  left: 10%;
  z-index: 90;
  margin-left: -15px;
  border-top: 15px solid #c15171;
  border-left: 15px solid transparent;
  border-right: 15px solid transparent;
  border-bottom: 0;
  content: "";
}
吹き出し
ミックスグリーン

最後は、グラデーションもやめた「吹き出し」だけのスタイルです。
.article h2{
  border:none;
  position: relative;
  margin-bottom: 30px;
  padding: 0.8em;
  background-color: #328a63;
  color: #fff;
  font-size: 22px;
  font-weight: bold;
  border-radius: 5px;
  -webkit-border-radius: 5px;
  -moz-border-radius: 5px;
}
.article h2:after{
  position: absolute;
  bottom: -15px;
  left: 10%;
  z-index: 90;
  margin-left: -15px;
  border-top: 15px solid #328a63;
  border-left: 15px solid transparent;
  border-right: 15px solid transparent;
  border-bottom: 0;
  content: "";
}
ミックスブルー

ミックスブルーのCSS。
.article h2{
  border:none;
  position: relative;
  margin-bottom: 30px;
  padding: 0.8em;
  background-color: #3f65a9;
  color: #fff;
  font-size: 22px;
  font-weight: bold;
  border-radius: 5px;
  -webkit-border-radius: 5px;
  -moz-border-radius: 5px;
}
.article h2:after{
  position: absolute;
  bottom: -15px;
  left: 10%;
  z-index: 90;
  margin-left: -15px;
  border-top: 15px solid #3f65a9;
  border-left: 15px solid transparent;
  border-right: 15px solid transparent;
  border-bottom: 0;
  content: "";
}
ミックスレッド

ミックスレッドのCSS。
.article h2{
  border:none;
  position: relative;
  margin-bottom: 30px;
  padding: 0.8em;
  background-color: #c15171;
  color: #fff;
  font-size: 22px;
  font-weight: bold;
  border-radius: 5px;
  -webkit-border-radius: 5px;
  -moz-border-radius: 5px;
}
.article h2:after{
  position: absolute;
  bottom: -15px;
  left: 10%;
  z-index: 90;
  margin-left: -15px;
  border-top: 15px solid #c15171;
  border-left: 15px solid transparent;
  border-right: 15px solid transparent;
  border-bottom: 0;
  content: "";
}
2色ボーダーの色を変える
ミックススキンの特徴である、サイドバーの見出し(H3)と投稿本文見出し(H3)の2色ボーダーの色を変えるカスタマイズです。
カスタマイズすると、こんな色に変更することができます。

このボーダーは、以下のCSSです。
サイドバーの見出し(H3)
/* 左のボーダー */
.sidebar h3:after {
  border-bottom: solid 3px #5d639e;
}
/* 右のボーダー */
.sidebar h3 {
  border-bottom: solid 3px #ffe600;
}
投稿本文の見出し(H3)
/* 左のボーダー */
.article h3:after {
  border-bottom: solid 3px #5d639e;
}
/* 右のボーダー */
.article h3 {
  border-bottom: solid 3px #ffe600;
}

このボーダーのCSSです。
サイドバーの見出し(H3)
/* 左のボーダー */
.sidebar h3:after {
  border-bottom: solid 3px #bf1e56;
}
/* 右のボーダー */
.sidebar h3 {
  border-bottom: solid 3px #0086ab;
}
投稿本文の見出し(H3)
/* 左のボーダー */
.article h3:after {
  border-bottom: solid 3px #bf1e56;
}
/* 右のボーダー */
.article h3 {
  border-bottom: solid 3px #0086ab;
}
トップページのタブをカスタマイズする
トップページのカスタマイズです。
Cocoon設定の「インデックス」→「フロントページタイプ」で「タブ一覧」を設定すると、トップページは標準では次のようなデザイになります。
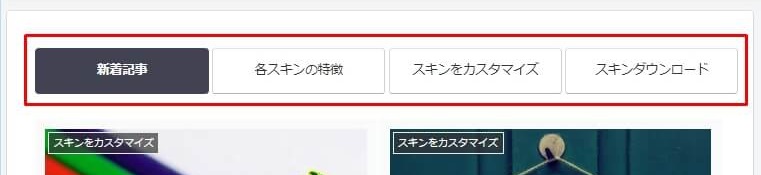
赤枠部分がタブの一覧部分になりますが、選択しているタブは背景が黒くなっているので、これをミックススキンのカラーに変更してみます。
タブの背景色を変える
クリックされたタブの背景色をベースカラーで変えるカスタマイズです。
ミックスグリーン
ミックスグリーンの場合、トップページのタブは次のようにカスタマイズ。

以下が、そのCSSです。
#index-tab-1:checked~.index-tab-buttons .index-tab-button[for=index-tab-1],
#index-tab-2:checked~.index-tab-buttons .index-tab-button[for=index-tab-2],
#index-tab-3:checked~.index-tab-buttons .index-tab-button[for=index-tab-3],
#index-tab-4:checked~.index-tab-buttons .index-tab-button[for=index-tab-4] {
  background: none #298c60;
  border:1px solid #298c60;
}
.index-tab-buttons .index-tab-button {
  border-color: #298c60;
}
ミックスブルー
ミックスブルーの場合のトップページのタブです。

#index-tab-1:checked~.index-tab-buttons .index-tab-button[for=index-tab-1],
#index-tab-2:checked~.index-tab-buttons .index-tab-button[for=index-tab-2],
#index-tab-3:checked~.index-tab-buttons .index-tab-button[for=index-tab-3],
#index-tab-4:checked~.index-tab-buttons .index-tab-button[for=index-tab-4] {
  background: none #28569a;
  border:1px solid #28569a;
}
.index-tab-buttons .index-tab-button {
  border-color: #28569a;
}
ミックスレッド
ミックスレッドの場合のトップページのタブです。

#index-tab-1:checked~.index-tab-buttons .index-tab-button[for=index-tab-1],
#index-tab-2:checked~.index-tab-buttons .index-tab-button[for=index-tab-2],
#index-tab-3:checked~.index-tab-buttons .index-tab-button[for=index-tab-3],
#index-tab-4:checked~.index-tab-buttons .index-tab-button[for=index-tab-4] {
  background: none #ce2c5a;
  border:1px solid #ce2c5a;
}
.index-tab-buttons .index-tab-button {
  border-color: #ce2c5a;
}
タブのボーダーを変える
次は、ボーダーで囲まれたタブをボトムのボーダーに変えるカスタマイズです。
クリックされたタブのボーダーはセカンドカラーに、それ以外はベースカラーになります。
ミックスグリーン

以下が、そのCSSです。
.index-tab-buttons .index-tab-button {
  border: none;
  border-bottom: 2px solid #009250;
  border-radius: 0;
}

#index-tab-1:checked ~ .index-tab-buttons .index-tab-button[for="index-tab-1"],
#index-tab-2:checked ~ .index-tab-buttons .index-tab-button[for="index-tab-2"],
#index-tab-3:checked ~ .index-tab-buttons .index-tab-button[for="index-tab-3"],
#index-tab-4:checked ~ .index-tab-buttons .index-tab-button[for="index-tab-4"] {
  background: none;
  border: none;
  color: #333;
  border-bottom: 2px solid #edad0b;
}
ミックスブルー

.index-tab-buttons .index-tab-button {
  border: none;
  border-bottom: 2px solid #3261ab;
  border-radius: 0;
}

#index-tab-1:checked ~ .index-tab-buttons .index-tab-button[for="index-tab-1"],
#index-tab-2:checked ~ .index-tab-buttons .index-tab-button[for="index-tab-2"],
#index-tab-3:checked ~ .index-tab-buttons .index-tab-button[for="index-tab-3"],
#index-tab-4:checked ~ .index-tab-buttons .index-tab-button[for="index-tab-4"] {
  background: none;
  border: none;
  color: #333;
  border-bottom: 2px solid #eaa8bf;
}
ミックスレッド

.index-tab-buttons .index-tab-button {
  border: none;
  border-bottom: 2px solid #c1385f;
  border-radius: 0;
}

#index-tab-1:checked ~ .index-tab-buttons .index-tab-button[for="index-tab-1"],
#index-tab-2:checked ~ .index-tab-buttons .index-tab-button[for="index-tab-2"],
#index-tab-3:checked ~ .index-tab-buttons .index-tab-button[for="index-tab-3"],
#index-tab-4:checked ~ .index-tab-buttons .index-tab-button[for="index-tab-4"] {
  background: none;
  border: none;
  color: #333;
  border-bottom: 2px solid #43a8ca;
}
トップページカテゴリー名をカスタマイズする
トップページは、さきほどのタブ形式ではなくカテゴリー別で表示させることもができ、標準ではカテゴリー名の両端に水平線がくっつきます。
カテゴリー名の水平線を2色ボーダーに変更する
この水平線を、各スキンごとに2色ボーダーに変更してみます。
ミックスグリーン
ミックスグリーンの場合、以下のように2色ボーダーにカスタマイズ。

このCSSは以下の通り。
.list-title-in {
  padding: 0 85px;
}
.list-title-in:before, .list-title-in:after {
  background: none;
  width: 70px;
  height: 2px;
}
.list-title-in:before {
  background-image: repeating-linear-gradient(
    to right,
    #edad0b 0%,
    #edad0b 25%,
    #009250 25%,
    #009250 100%);
}
.list-title-in:after {
  background-image: repeating-linear-gradient(
    to right,
    #009250 0%,
    #009250 75%,
    #edad0b 75%,
    #edad0b 100%);
}
ミックスブルー
ミックスブルーの場合、以下のように2色ボーダーにカスタマイズ。

このCSSは以下の通り。
.list-title-in {
  padding: 0 85px;
}
.list-title-in:before, .list-title-in:after {
  background: none;
  width: 70px;
  height: 2px;
}
.list-title-in:before {
  background-image: repeating-linear-gradient(
    to right,
    #eaa8bf 0%,
    #eaa8bf 25%,
    #3261ab 25%,
    #3261ab 100%);
}
.list-title-in:after {
  background-image: repeating-linear-gradient(
    to right,
    #3261ab 0%,
    #3261ab 75%,
    #eaa8bf 75%,
    #eaa8bf 100%);
}
ミックスレッド
ミックスレッドの場合、以下のように2色ボーダーにカスタマイズ。

このCSSは以下の通り。
.list-title-in {
  padding: 0 85px;
}
.list-title-in:before, .list-title-in:after {
  background: none;
  width: 70px;
  height: 2px;
}
.list-title-in:before {
  background-image: repeating-linear-gradient(
    to right,
    #43a8ca 0%,
    #43a8ca 25%,
    #c1385f 25%,
    #c1385f 100%);
}
.list-title-in:after {
  background-image: repeating-linear-gradient(
    to right,
    #c1385f 0%,
    #c1385f 75%,
    #43a8ca 75%,
    #43a8ca 100%);
}
カテゴリー名の水平線を見出し(H4)に変更する
今度は、カテゴリー名の水平線を各スキンの見出し(H4)に変更してみます。
ミックスグリーン
ミックスグリーンの場合、以下のようにカスタマイズ。

このCSSは以下の通り。
.list-title-in {
  padding: 0 35px;
}
.list-title-in:before {
  border: 2px solid #edad0b;
  top: -14px;
}
.list-title-in:after {
  border: 2px solid #009250;
  top: -2px;
  left: -2px;
}
.list-title-in:before, .list-title-in:after {
  background: none;
  bottom: 0;
  width: 12px;
  height: 12px;
  margin: auto;
}
ミックスブルー
ミックスブルーの場合、以下のようにカスタマイズ。

このCSSは以下の通り。
.list-title-in {
  padding: 0 35px;
}
.list-title-in:before {
  border: 2px solid #eaa8bf;
  top: -14px;
}
.list-title-in:after {
  border: 2px solid #3261ab;
  top: -2px;
  left: -2px;
}
.list-title-in:before, .list-title-in:after {
  background: none;
  bottom: 0;
  width: 12px;
  height: 12px;
  margin: auto;
}
ミックスレッド
ミックスレッドの場合、以下のようにカスタマイズ。

このCSSは以下の通り。
.list-title-in {
  padding: 0 35px;
}
.list-title-in:before {
  border: 2px solid #43a8ca;
  top: -14px;
}
.list-title-in:after {
  border: 2px solid #c1385f;
  top: -2px;
  left: -2px;
}
.list-title-in:before, .list-title-in:after {
  background: none;
  bottom: 0;
  width: 12px;
  height: 12px;
  margin: auto;
}


コメント
初めまして。
cocoonでミックスブルーを利用させていただいているつばめと言います。
スキン気に入っているのですが、下記2つをカスタムしてオリジナリティを出したいと考えています。
1. PCサイドバーメニュー名囲み、モバイルフッターメニュー名(aliceblueで囲み、ネイビー文字)
2. ランキングの色変(オレンジ→aliceblueへ)
1. についてはcssを書き、pcでは反映されるのですが、モバイルではなぜか黒文字のままです。他に設定で変更すべきところがありますか?
2. についてはcssコードが分からないので、もしよろしければご回答いただけますと幸いです。
よろしくお願いします。
ミックスブルーを使っていただきありがとうございます!ヒロアキと言います。
すみませんが、できればカスタマイズしているブログのURLを教えてもらえないでしょうか。
実際のCSSを見たほうが回答しやすいと思います。
このコメントではなく、メニューの「お問い合わせ」からURLを送ってもらえればと思います。
お手数ですが、よろしくお願いします。
あ、URL書いてましたね、失礼しました。
今からCSS見てみます。
1.の「メニュー名囲み」は以下のCSSを追加すれば、モバイルでもPCと同じように表示されるはずです。
.footer-mobile h3 {
  padding: .5em;
  background: aliceblue;
  color: #2E507E;
  text-align: center;
  box-shadow: 0 0 4px rgb(0 0 0 / 23%);
}
「.sidebar h3」に追加したCSSと同じ内容です。
paddingとかはモバイル用に微調整した方がいいでしょうね。
2.の「ランキング表示」というのは数字のオレンジ(黄色)をaliceblueに変更したいということでいいんですね?
以下のCSSを追加してください。
.widget-entry-cards.ranking-visible .card-thumb::before {
  color: aliceblue;
}
試してみた限り、aliceblueだと色は白っぽいので、もっと濃い色にした方がいいと思います。
【補足】
Cocoon設定の「モバイル」→「モバイルボタン」で「モバイルボタン時コンテンツ下のサイドバーを表示」にチェックをつければ、今回のようにモバイル用のCSSを追加する必要はないです。
でも、モバイルの時はPCと違うメニュー表示にしたいので、モバイルフッターのウィジェットを追加しているんですよね。
ミックススキンは、モバイルフッターのウィジェットは想定していないので、今回のようにモバイル用のCSSのを追加する必要があります。
以上ですが、ちょっと試してみてください。
よろしくお願いします!
早々のご対応ありがとうございます!
またPC触れる時間が取れたら早急に対応します。
おはようございます。
ご提示いただいたcss入れたら理想通りに反映しました。
ありがとうございます!
補足情報については知りませんでした(ただモバイルはアドセンス広告少なくしたいので別設定です)
本当にありがとうございました。
ちゃんとできたようでよかったです。
また何かあったら問い合わせてください!